AI-driven image transformation is reshaping creative workflows by automating tedious edits and unlocking new artistic directions in seconds. Have you ever wanted to transform your photos into captivating works of art with just a few clicks? Image-to-image AI technology is revolutionizing how you can enhance and modify images, letting you preserve the core composition of a photograph while applying new styles or edits.
Whether you’re looking to generate image variations for social media visuals, restyle product photos for e-commerce, or create a custom avatar, the best AI tools for image transformation offer versatility and ease. Many platforms accept common upload image formats like .jpeg, .jpg, .png, and .webp and provide controls for aspect ratio, output variations, and quality. Try a quick test to see how a single uploaded photo can produce multiple final results in under a minute on many services—then read on to compare top tools, tips, and how Oreate AI stands out as a fast, beginner-friendly image image generator.
Image-to-Image AI Explained: Beyond Text-to-Image
When exploring AI image editing explained, it helps to start with the core difference: text-to-image vs image-to-image AI. Text-to-image models generate images solely from text prompts, while image-to-image AI uses an existing image as the reference and transforms it—preserving important compositional elements and subject placement so the final result still reads like the original photo.
Put simply, the typical core process with image-to-image systems is: upload → interpret → transform. You upload an image (the uploaded image used as an image reference), the model interprets the visual details and any accompanying prompt, then it generates image variations or a single generated image that applies the requested edits or style changes.

Because image-to-image models start with a photo, they’re ideal for consistent edits and style control—why professionals and hobbyists often choose use image-to workflows. Practical applications include photo enhancements (cleaning details and color), avatar creation from a headshot, and poster design where the subject and layout must remain recognizable.
The difference also shows up in advanced features: inpainting lets you edit parts of the photo (remove or replace objects) and outpainting expands the scene beyond its original borders; smart background replacement swaps settings while keeping the subject intact. These capabilities are harder to achieve reliably with text-only generation because they depend on a real image reference and fine-grained control over visual details.
Here’s a quick comparison to summarize:
| Feature | Text-to-Image AI | Image-to-Image AI |
|---|---|---|
| Source Input | Text Descriptions | Existing Images / Upload Image Reference |
| Applications | New Image Generation (creative concepts) | Photo Editing, Style Transfer, Avatars, Posters |
| Preservation of Original Structure | No (compositional changes likely) | Yes (keeps subjects, poses, layout) |
| Flexibility with Existing Content | Limited | High (inpainting, background replacement, batch variations) |
In summary, understanding the difference between text to image and image to image AI clarifies when to choose each approach: use text-to-image for brand-new concepts, and use image-to-image when you need precise, consistent transformations that build on a source photo.
Unique Features That Make Image-to-Image AI Essential
Image-to-Image AI includes a set of features that make it indispensable for creators who need reliable, repeatable transformations. Key capabilities include advanced style transfer, precise inpainting and outpainting, smart background replacement, efficient batch transformation, and built-in NSFW content filters to safely handle sensitive images.
Style transfer: turn photos into sketches, anime, or paintings.
AI style transfer converts a single image into multiple artistic styles—turn a portrait into an anime-style character, render a product photo as a clean vector-style mockup, or transform a landscape into an oil painting. These stylistic variations let you test different looks for branding, thumbnails, or art exploration without losing the original subject.

Inpainting & outpainting to edit or expand existing images.
With AI inpainting tools, you can remove unwanted objects, repair damaged photos, or replace specific elements—think “erase background clutter” or “change a shirt color” with pixel-accurate edits. Outpainting extends the canvas so you can expand a scene (for posters or wider product shots) and add new elements that match the original image’s lighting and perspective.
Smart background replacement for commercial or social media use.
Smart background replacement isolates the subject from the image reference and substitutes new contexts—useful for e-commerce product shots, social media banners, or ad creatives. Pro tip: start with a clean, high-res image to improve mask accuracy and reduce artifacts when swapping backgrounds.
Batch transformation: create multiple outputs efficiently.
Batch image processing lets you generate many variations in one run—ideal for A/B testing thumbnails, producing multiple product angles, or delivering dozens of avatar styles at once. For best results, use consistent image references and standardized prompts so the generated images remain comparable and high-quality.
Finally, robust platforms include NSFW filters to automatically detect and block explicit content, ensuring safe handling of sensitive images and compliance with platform policies—an important image feature for teams producing commercial content.
How to Use AI to Generate Image from Image?
Creating images with AI is now as easy as flipping a switch. You just tell it what you want, and in seconds, you get a stunning visual that brings your idea to life. Whether you’re designing a poster, a social media graphic, a product mockup, or simply exploring creative concepts — all it takes is a good prompt and a few clicks.
Let’s walk through the process using Oreate AI, a simple, fast, and powerful image generation tool. This guide will show you how to go from an idea to a finished image step-by-step.
Meet Oreate AI — Your All-in-One Creative Workspace
Oreate AI helps you create instant visuals from simple text descriptions — but that’s just the beginning. It’s an all-in-one AI workspace designed to make everyone work like a pro, no matter your background or skill level.
With Oreate AI, you can:
-
Generate stunning images in seconds from detailed prompts.
-
Design professional presentations (PPTs) with just a few clicks.
-
Run deep research and summarize complex topics instantly.
-
Create AI podcasts and engaging audio content.
-
Write essays with fluent language and real citations.
Whether you’re a designer, marketer, student, or business owner, Oreate AI helps you turn ideas into finished work faster — saving hours of manual effort. It’s built to simplify creative workflows, boost productivity, and make high-quality content creation accessible to everyone.
So when it comes to AI image generation, Oreate AI gives you a clean, intuitive space to bring your vision to life — from a few words to a complete visual concept in seconds.
Step-by-Step: How to Use Oreate AI Image Generator
1. Write a Prompt (The Key Step)
Your prompt is what tells Oreate AI what to create. The more specific and descriptive it is, the better your result will be. Include details like subject, setting, style, lighting, composition, and mood.
Of course, Oreate AI doesn’t just create new images — it can also beautify and edit your existing photos. Simply upload your picture, then type what you’d like to adjust. Oreate AI will automatically apply those edits, giving your photos a clean, polished look in seconds.
Prompt Template:
Subject + Scene + Style + Color tone + Composition
Examples:
-
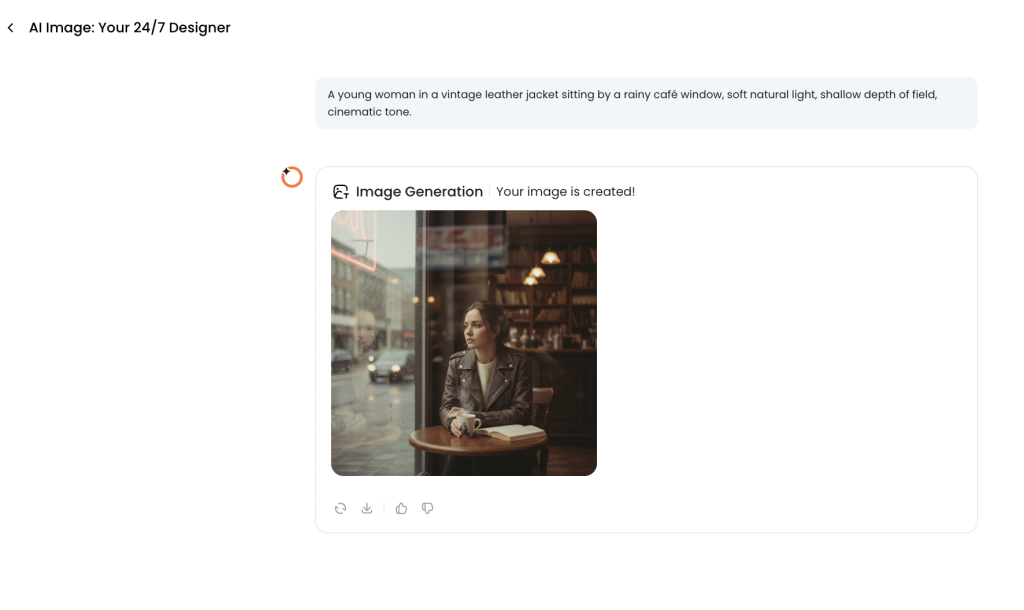
Portrait:
“A young woman in a vintage leather jacket sitting by a rainy café window, soft natural light, shallow depth of field, cinematic tone.” -
Product Rendering:
“Minimalist smartwatch on a marble surface, top-down view, realistic lighting and reflection, silver and deep blue color palette.” -
Concept Art:
“Cyberpunk city at night with neon reflections on wet streets, tall towers, flying cars, wide-angle shot, dynamic composition, purple and blue tones.”

2. Generate and Preview
Click Generate. In a few seconds, you’ll get an image according to your prompt.
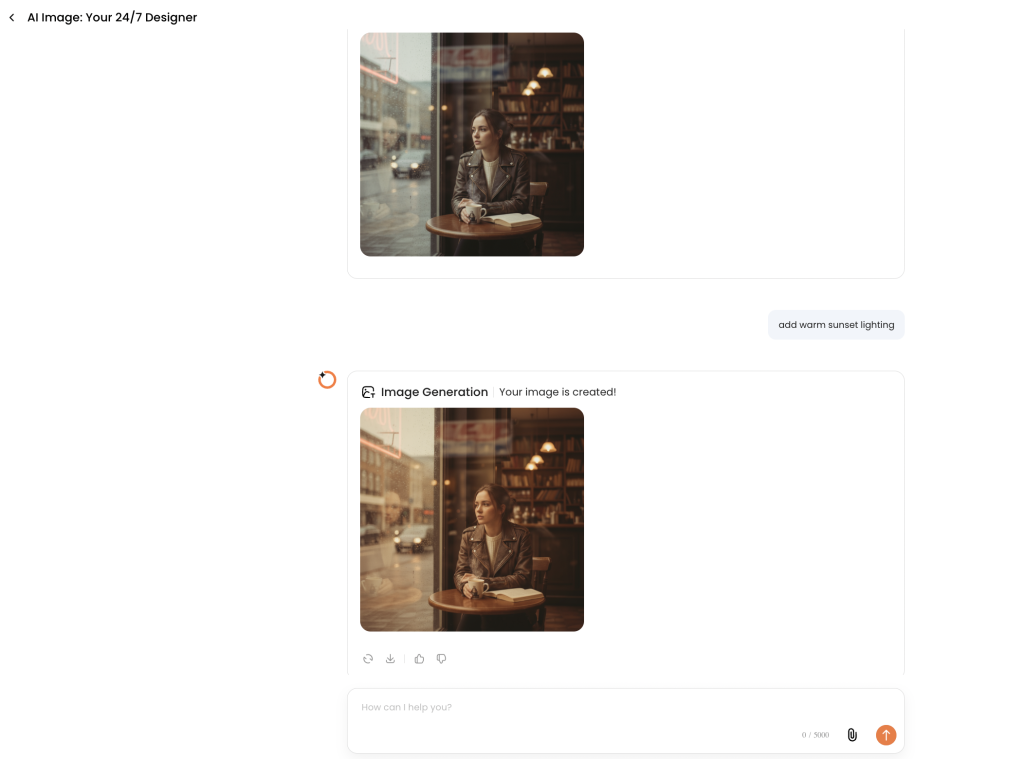
3. Refine with Redo or Prompt Edits
Click Redo or adjust your prompt to make changes. Try small, focused edits for better control.
Examples of quick improvements:
-
Add more detail → “highly detailed texture,” “sharp focus,” “ultra-realistic lighting.”
-
Change tone → “warm sunset lighting,” “low contrast,” “soft pastel palette.”
-
Adjust framing → “centered composition,” “top-down view,” “portrait orientation.”
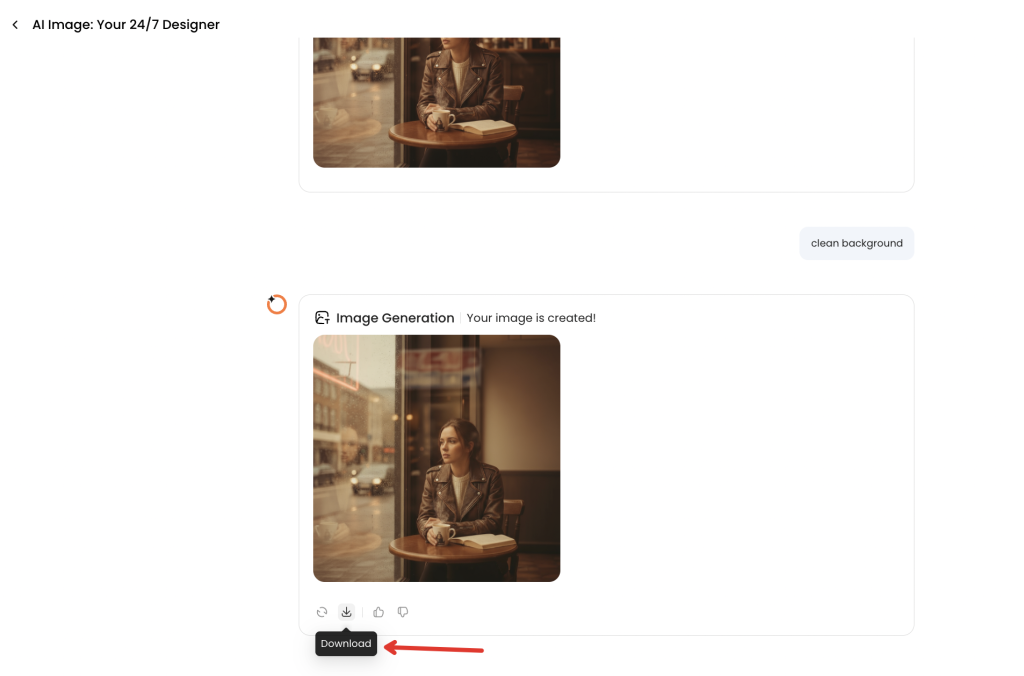
-
Remove mistakes → “no text,” “clean background,” “fix proportions.”
4. Adjust Output Settings (Optional)
Before generating, you can fine-tune:
-
Aspect Ratio (1:1, 16:9, 9:16) — choose based on your platform (e.g., Instagram post vs. banner).
-
Resolution — higher resolution gives sharper results but takes slightly longer.
-
Seed Number — keeps results consistent for future use.
-
Style Strength — controls how closely the image follows your chosen aesthetic.
5. Download Your Final Image
Once you’re happy with your preview:
-
Click Download.
-
Choose your preferred resolution or format (PNG/JPG).
-
Save it to your device.
-
Double-check details if you plan to print or post it at high resolution.
Creative Use Cases for Image-to-Image AI
Image-to-image AI is changing how creators produce visuals across industries. Whether for social media, e-commerce, content creation, or personal projects, these tools let you quickly test ideas, keep visual consistency, and generate many variations from a single photo reference.
1) Social media branding: cover images, story visuals, ads
Use image-to-image workflows to produce on-brand cover images, story visuals, and ad creatives. Example: upload a campaign photo and generate 5 thumbnail and story variations in one batch to A/B test which visuals perform best on feeds.
2) E-commerce: product restyling, mockups, and promotional visuals
For online stores, image-to-image AI can restyle product photos, create lifelike mockups, or place products in new settings. Example: convert one studio shot into multiple lifestyle scenes and color variations to populate product listings and promotional banners.

3) Content creators: thumbnails, video illustrations, memes
Creators can rapidly iterate thumbnails, video illustrations, and memes to keep channels fresh. Example: generate multiple thumbnail styles from a single frame—cartoon, high-contrast, and cinematic—then pick the best-performing visual.
4) Artists: style exploration, digital painting, comic art
Artists use image-to-image tools for style exploration and digital painting workflows—transform sketches into finished pieces or experiment with comic art panels. Example: upload a pencil sketch and generate versions in watercolor, manga, and oil-painting styles to inspire the final piece.
5) Fun & personal: avatars, posters, holiday cards
On the personal side, these tools are great for making avatars, posters, and holiday cards. Example: turn a selfie into a stylized avatar or a festive poster for social sharing—fast, affordable, and fun.
Want to try a quick experiment? Upload a photo to Oreate AI and generate avatar and poster variations to see how easily you can produce polished visuals for social, commerce, or personal use.
Common Mistakes to Avoid
When diving into the world of Image-to-Image AI, it’s essential to be aware of common pitfalls that can undermine your outputs. Avoiding these errors will improve your editing workflow and help you get consistent, high-quality results.
Using Low-Resolution Images
One frequent error is starting with low-resolution images. Small or blurry inputs (for example, a 400px-wide crop) usually produce poor generated images, while higher-resolution photos (2000–3000px where possible) preserve details and yield much better final results. Quick fix: reshoot or upscale the source photo before submitting.
Relying Solely on Defaults
Don’t stick with default presets and expect perfect results. Experiment with styles, prompts, and filters to discover the best approach for your subject. Tweak text prompts to emphasize the details you want changed (lighting, color, or mood) and try multiple styles to find the most effective look.
Ignoring NSFW Settings
Always verify NSFW filters and content-handling settings—especially before running batch jobs or producing commercial assets. Failing to check these can lead to inappropriate outputs or compliance issues. Quick fix: test a single image through the workflow first and confirm filters are enabled.
| Common AI Image Errors | Consequences | Solutions |
|---|---|---|
| Low Resolution | Poor Quality Output | Upscale or reshoot; use high-res source images |
| Default Settings | Missed Creative Opportunities | Adjust prompts, try different styles and filters |
| NSFW Settings Ignored | Inappropriate Content | Verify and enable NSFW filters before batch runs |
Conclusion
Image-to-image AI is reshaping how creators produce visuals by making high-quality transformations faster, more consistent, and more affordable. Across social media, e-commerce, and professional design, these tools let you convert a single photo into many useful outputs—avatars, posters, product visuals, and more—while preserving the important elements of the original image.
Oreate AI is a strong example of an accessible, cost-effective image generator that bridges novice-friendly workflows and professional features like batch processing and advanced templates. Whether you’re refining a product photo for a listing or experimenting with artistic styles, try combining an uploaded image with a clear prompt to speed up iteration and improve the final result.
Encouragement: experiment with different styles, respect NSFW and licensing rules, and run a quick free image test or trial to see which tool fits your workflow best—then scale with batch processing once you find the right combination of prompts and image references.
FAQs
In this section, we answer common questions about image-to-image AI so beginners and pros alike can get practical, actionable guidance for using these image generator tools effectively.
1. Can beginners use image-to-image AI without experience?
Yes. Most modern image-to-image AI platforms prioritize a beginner-friendly UI with presets and one-click transforms. Quick steps to get started: 1) upload a clear image reference, 2) choose a preset or simple prompt (e.g., “soft portrait, warm tones”), 3) run a small batch to compare a few generated images. Tools like Oreate AI are designed to make this workflow easy while still producing professional-looking results.
2. How do NSFW filters work in AI image generators?
NSFW filters detect and block explicit or sensitive content using trained classifiers and rule-based checks. These systems scan uploaded images and generated outputs, flagging or preventing exports that violate safety policies. Best practice: verify the platform’s NSFW policy and test a single image before running large batches to ensure filters behave as expected.
3. Which tools offer batch processing for faster workflows?
Many image image generators include batch processing—useful for thumbnails, product variants, or A/B testing. Examples: Oreate AI supports batch runs so you can produce multiple images from one reference and set of prompts. When evaluating a tool, check free image quotas, max batch size, and export formats to match your workflow needs.
4. How can I combine prompts and uploaded images effectively?
Combine an uploaded image reference with a clear text prompt for the most precise results. Try this 3-step approach: 1) upload a high-res image, 2) add a concise prompt specifying style, mood, and details (e.g., “cinematic portrait, high contrast, teal-orange grade”), 3) refine by iterating—adjust prompts, use inpainting for small fixes, and run another batch to compare the updated outputs.
5. Can I use image-to-image AI for commercial projects?
Yes. Many platforms, including Oreate AI, allow commercial use, but licensing varies. Always check the terms of service for each tool, ensure proper attribution if required, and confirm that generated content doesn’t infringe on third-party copyrights before publishing or selling.